What Type of Caulk for Window Installation

What type of caulk for window installation is a flexible exterior sealant, such as 100% silicone, plus acrylic latex inside. Exterior sealant has to stretch with 2 materials that move at different rates. Gaps wider than about 1/4 inch need a foam backer rod first. The frame, the wall and the paint plan decide the final choice for each joint.
Key Takeaways
- Exterior window joints need a flexible sealant such as 100% silicone, polyurethane or a hybrid polymer.
- Interior trim gaps take paintable acrylic latex, because interior joints move less and need a clean painted finish.
- Silicone does not accept paint, while polyurethane and hybrid polymers can be painted once they harden.
- Never seal weep holes or drainage paths, because they let trapped water leave the window.
- Impact window installations follow the sealant and fastener details written in each product approval.
What Type of Caulk Should You Use for Window Installation
The type of caulk for window installation depends on where the joint sits and what the sealant touches. Outside, a flexible, weather-resistant sealant is the standard choice. Inside, a paintable acrylic latex caulk finishes the gap between the frame and the trim.
Caulk is a flexible material that fills a narrow joint and blocks air and water. Windows and walls expand and contract with heat and humidity, so a stiff filler cracks quickly. Our storm-rated windows pages show the kind of openings that depend on a sound seal.
Three exterior options cover nearly every Florida window joint. Knowing what type of caulk for window installation suits each joint prevents leaks. The next section clarifies what separates a caulk from a sealant.
Is Window Sealant the Same as Caulk
Window sealant is not exactly the same as caulk, although people use the words for the same job. Caulk usually means a lower-movement filler for small interior gaps. Sealant usually means a higher-movement material rated to handle joint movement outdoors.
Product labels blur the line, so the label name matters less than the movement rating and the surfaces listed. A sealant for exterior window perimeters should state that it bonds to the frame material and the wall material. Reading those two lines on the tube prevents many mismatches.
Silicone is the first exterior option to understand, because many homeowners ask whether it beats ordinary caulk.
Do You Use Silicone or Caulk for Windows
You use silicone for windows on joints exposed to sun, rain and movement. You use acrylic latex caulk for interior gaps that get painted. Silicone stays flexible through temperature swings and resists ultraviolet (UV) light. Acrylic latex cleans up with water and accepts paint.
Silicone bonds well to glass, aluminum and other smooth surfaces. Silicone does not accept paint, so a painted trim joint needs a different product. A silicone bead on a surface that later needs painting is hard to correct.
Silicone also has limits that matter in the field. The next question covers where not to use silicone caulk.
Where Should You Not Use Silicone Caulk
You should not use silicone caulk on a painted joint or on a joint that holds a different sealant type. Paint peels off hardened silicone. New silicone also bonds poorly to old polyurethane and the reverse.
Some porous surfaces, such as stucco, concrete and masonry, can grip silicone less reliably than a polyurethane or hybrid polymer. Always check the tube for approved surfaces. A product that lists the exact wall material is the safer pick.
Many contractors choose between silicone and polyurethane for exterior joints, so the two deserve a direct comparison.
Is Silicone or Polyurethane Better for Exterior Windows
Neither silicone nor polyurethane is better for every exterior window, because each one suits different surfaces. Silicone suits glass, aluminum and other metal frames in strong sun. Polyurethane suits wood, brick, concrete and stucco, and it accepts paint once it hardens.
Polyurethane has downsides. Sun exposure wears an unpainted bead faster than silicone, so a polyurethane joint usually gets painted. It can also stain or fail to bond when it meets silicone, and some types react with certain plastic flashing membranes.
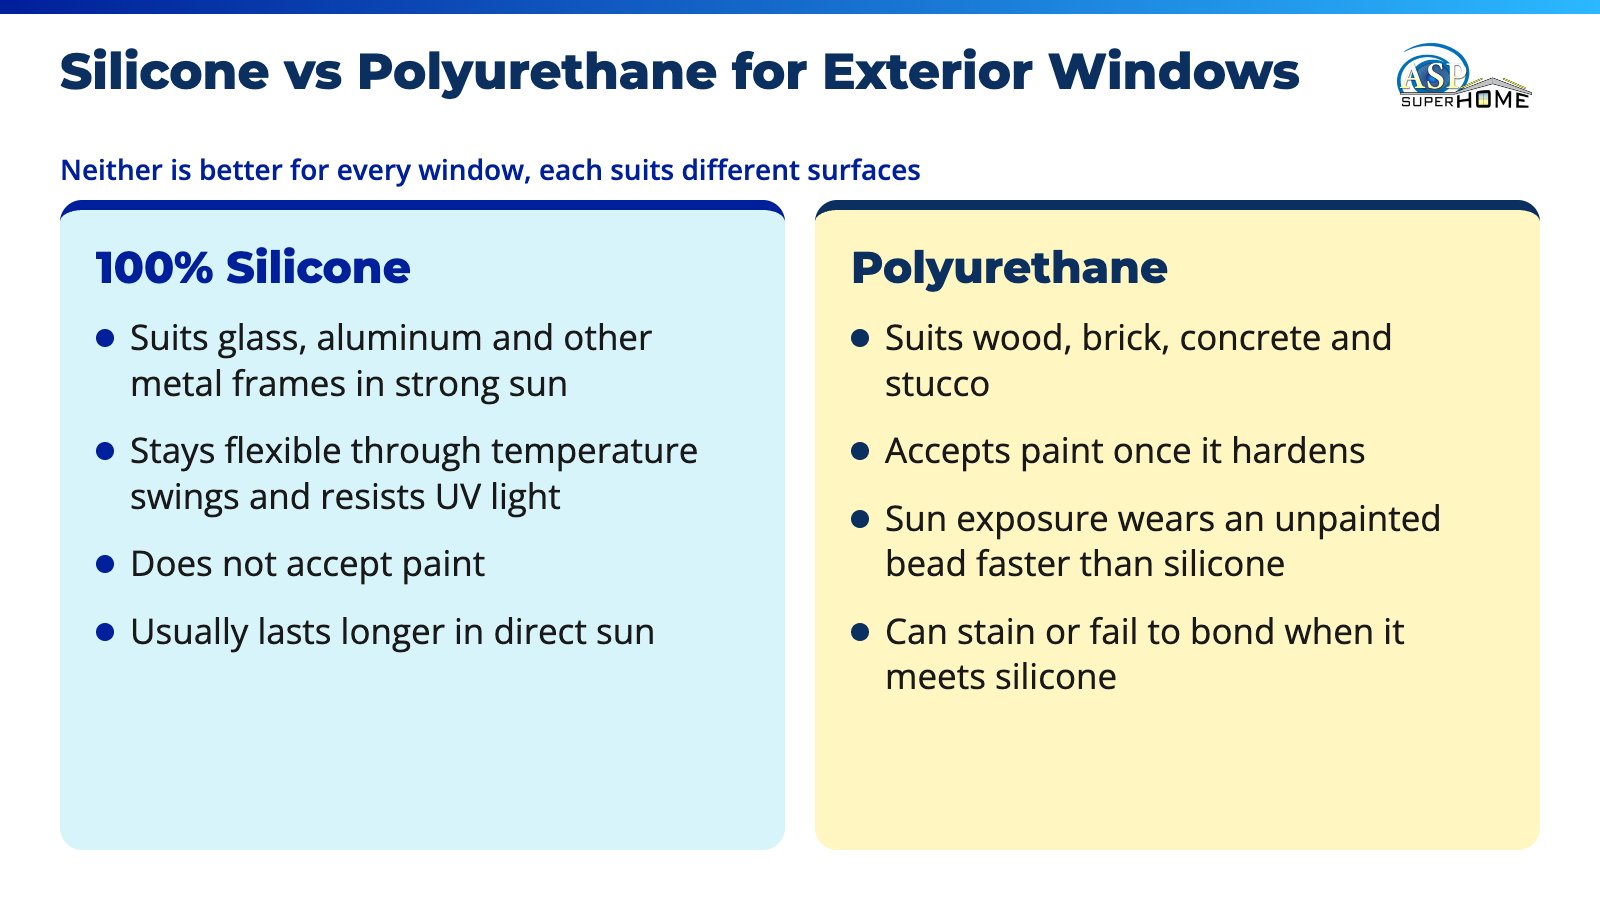
Choosing what type of caulk for window installation also means weighing sun exposure. Silicone usually lasts longer in direct sun, while polyurethane grips porous walls better. Florida heat, UV and salt air favor a high-movement sealant that the manufacturer approves for each surface. A hybrid polymer blends traits of both, which explains its popularity with installers.
What Sealant Do Window Installers Use
Window installers use a high-movement exterior sealant that the window manufacturer and the product approval allow. That is frequently a hybrid polymer, a polyurethane or a 100% silicone, depending on the frame and wall. Professional crews also use foam backer rod, flashing tape and interior caulk.
A hybrid polymer, sometimes called a silyl-terminated polymer, bonds to many surfaces and accepts paint. Installers value it because one product can seal the frame, the wall and the flashing joints. Product literature lists which materials it bonds to.
Impact window installation depends on the approval paperwork. Impact windows in Florida carry a Florida Product Approval or a Miami-Dade Notice of Acceptance (NOA). Those documents set the installation method, including fasteners and sealing details. A crew that follows that document does not swap sealants freely. A step-by-step installation guide shows where each sealant step fits.
Do You Caulk the Inside or Outside of Windows
You caulk both the inside and the outside of windows, but each side takes a different material. The outside joint blocks rain and wind with a flexible exterior sealant. The inside joint closes the gap between the frame and the trim.
The exterior seal is the one that keeps water out of the wall. The interior caulk mainly stops air leaks and gives a clean painted line. An interior bead is not a substitute for a sound exterior seal.
Interior caulk also covers the foam or filler placed in the gap during installation. The bottom edge of the window needs its own rules, covered next.
Do You Caulk the Bottom of a Window When Installing
You caulk the bottom of a window when installing only as the manufacturer directs. Caulk never blocks drainage. Many windows have weep holes or sill drainage paths at the bottom. Those paths release water that gets past the frame.
A fully sealed sill can trap water inside the window or wall. That trapped water leads to rot, mold and stained trim. The installation instructions state which sill edges get sealant and which stay open.
Windows with a nailing flange, a thin rim around the frame that fastens to the wall, follow a stricter order. The flange is sealed at the sides and top and flashed in a set sequence. Because errors here cause leaks, the next section covers the places that should stay uncaulked.
Where Should You Not Caulk a Window
You should not caulk weep holes, drainage slots, moving sash parts, tracks or the gap that the instructions say must stay open. Caulk in those places blocks water exit or stops the window from operating. A window that cannot drain or move fails early.
- Weep holes and drainage channels along the bottom of the frame
- The tracks and moving edges of sliding and operable sashes
- Any gap that the product approval lists as unsealed
- Over old, failing caulk that has not been removed
Keeping those areas clear protects the seal that does matter. Next, the full sealing process shows how the right caulk goes in.
How Do You Properly Seal a Window When Installing
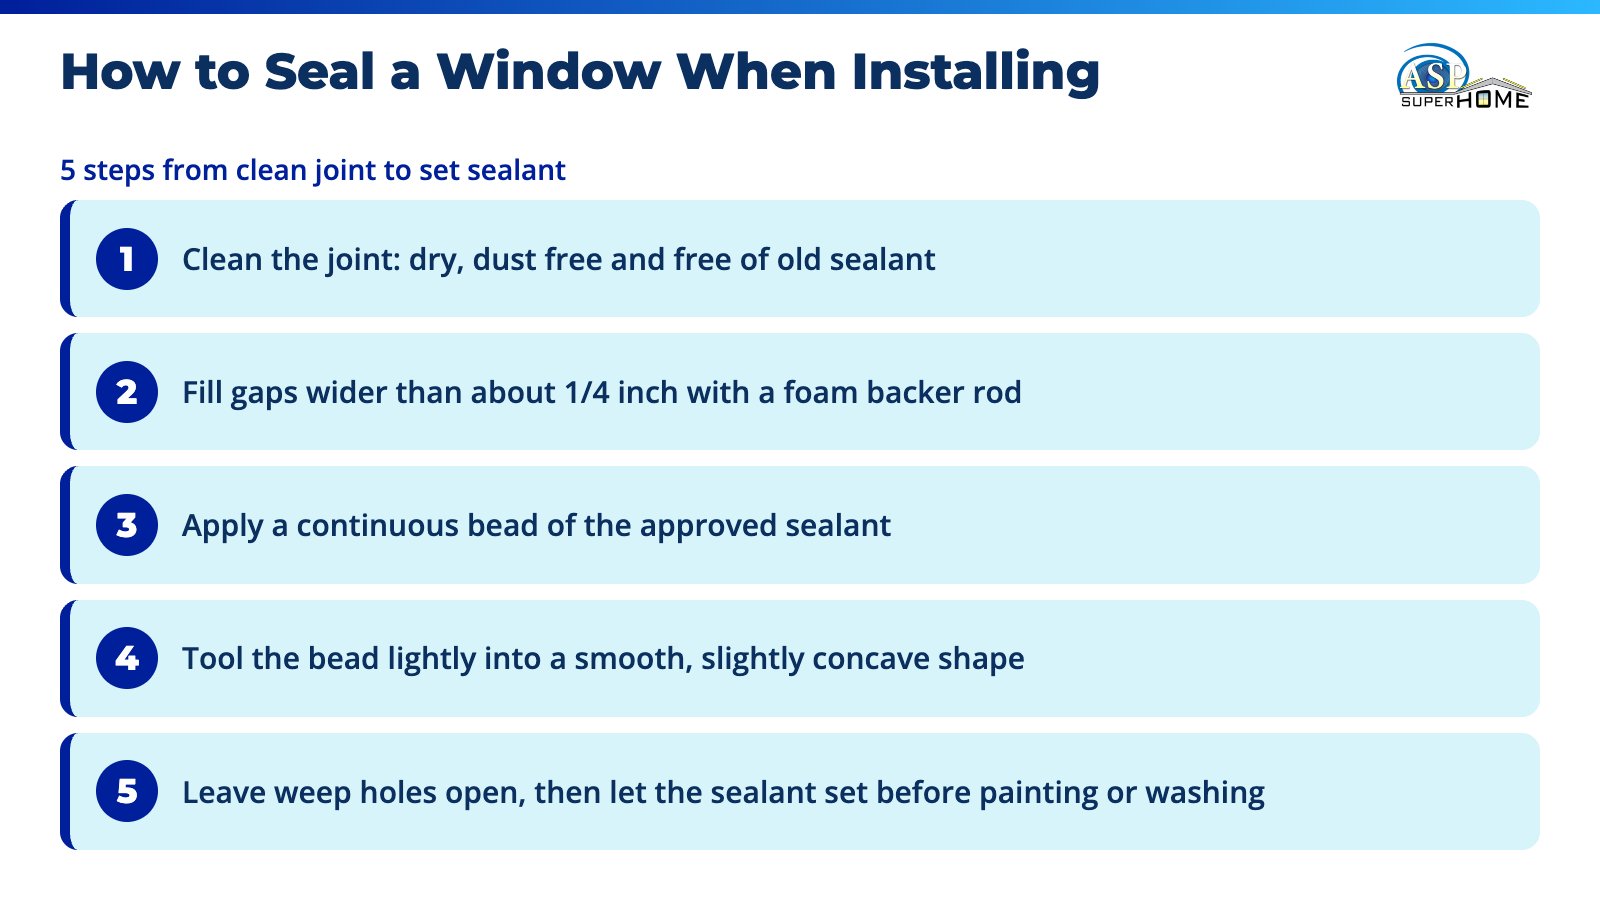
You properly seal a window when installing by preparing the joint, setting backer rod, applying a continuous bead and tooling it smooth. Each step prevents a different failure. Skipping the joint preparation is the usual reason a new bead peels.
- Clean the joint so the surfaces are dry, dust free and free of old sealant.
- Fill gaps wider than about 1/4 inch with a foam backer rod before sealing.
- Apply a continuous bead of the approved sealant without stopping partway along a side.
- Tool the bead lightly so it contacts both surfaces and forms a smooth, slightly concave shape.
- Leave weep holes and drainage paths open, then let the sealant set before painting or washing.
A backer rod is a round foam strip pressed into a deep gap. It sets the sealant depth and keeps the bead from sagging. Sealant that is too thick cracks, and sealant that is too thin tears away.
Correct screws and anchors matter as much as the bead, so our guide on screw sizes pairs well with this process. Even a perfect bead eventually ages, which raises the question of recaulking.
Can You Put New Caulk Over Old Caulk on Windows
You can put new caulk over old caulk only when the old bead is sound, clean and the same material. Cracked, peeling or moldy caulk should come out first. New sealant bonds to a clean surface, not to a failing layer.
Removal takes a utility knife, a plastic scraper and a cleaner for residue. Silicone residue needs extra care, because new sealant will not stick to it. Dry the joint fully before applying anything new.
Old caulk that fails over and over can point to a bigger problem. Our list of sealing mistakes shows how poor flashing and wrong anchoring cause repeat leaks. Knowing when to recaulk is the next practical step.
How Frequently Do Windows Need Caulked
Windows need recaulking when the bead cracks, shrinks, peels or pulls away from the frame, not on a fixed calendar. Quality exterior sealant lasts for years, yet sun and salt air wear it down. A yearly look is a sensible habit.
Florida homeowners can time that check before hurricane season, which runs from June 1 to November 30. Look for hairline cracks, gaps at corners and stains below the window. Water stains on interior trim can signal a leak that started outside.
Frequent leaks around a window may mean the window itself has aged. The failing windows article explains when replacement beats repair.
What Else Should You Know About Window Caulk
Window caulk raises several practical questions beyond the product choice. The short answers below cover tooling, cost, setting time, and how caulk relates to impact windows.
Is It Better to Caulk With a Tool or Finger
Using a tool is better for exterior sealant, while a wet finger works for small interior latex beads. A smoothing tool or plastic spoon gives an even shape. Wet fingers can smear silicone and leave a ragged edge.
What Is the Average Cost to Recaulk Windows
The cost to recaulk windows depends on the number of windows, their height, access and the amount of old caulk to remove. Two-story and hard-to-reach windows take more time. A written estimate lists the scope so the quote is easy to compare.
How Long Does Window Caulk Take to Set
Window caulk forms a skin in minutes to hours and hardens fully later, depending on the product, joint depth and weather. Warm, humid Florida air speeds some types and slows others. The tube label lists the paint and rain-free times.
Can Caulk Fix a Leaking Window
Caulk can fix a leaking window only when the leak comes from a failed bead at the exterior joint. Leaks from flashing, cracked glass or a failed frame need other repairs. Our do-it-yourself risks article explains why a hidden leak source is easy to misdiagnose.
Does Caulk Matter for Impact Windows
Caulk matters for impact windows because the seal is part of the tested installation. Impact glass and frames resist flying debris, while sealant and anchors keep the unit watertight in its opening. Both follow the product approval.
How ASP Super Home Helps With Window Installation and Sealing
ASP Super Home helps homeowners with window installation that follows each product approval, including the sealing details. Our in-house window installation crews handle the work, and our permitting team manages approvals and inspections. A project manager stays your contact from the first visit to the final walkthrough.
Our replacement windows page lists the products we install for South Florida homes.
Manufacturer and workmanship coverage appear on the installation coverage page.
Homeowners can use the online estimate form for a free estimate or call 786-933-9815.
Our guide explains how to choose an installation service before any work begins.
Our story and services are on the ASP Super Home site, serving homeowners since 2006.
Meet With a Project Manager
Your first conversation is with a Project Manager who takes the time to understand your goals, walk you through your options, and stays connected throughout your project — from the initial consultation through the final walkthrough.


Insights & Resources
Stay informed with expert tips on roofing materials, hurricane codes, repairs, and South Florida construction standards.