


What Size Screws for Window Installation
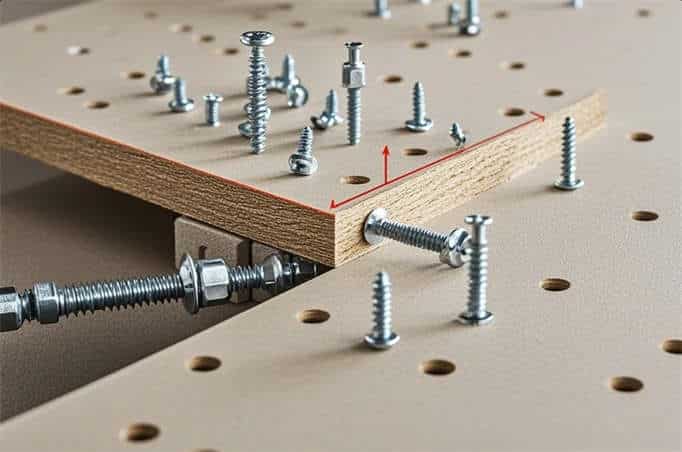

The standard screw size for window installation is a #8 or #10 diameter screw, ranging from 1 to 3 inches long, depending on whether you are securing a nail fin to sheathing or fastening directly through the side jamb into structural framing. Nail-fin windows in new construction typically require #8 washer-head or pan-head screws at 1 to 1.5 inches, while replacement pocket windows need longer #8 or #10 screws at 2 to 3 inches to span the gap through shims and anchor deeply into wall studs. The right screw keeps your window stable, airtight, and able to handle wind loads for decades. The wrong screw leads to loose frames, air leaks, and failed inspections. This guide covers every factor that determines the correct screw size, type, material, and spacing for your specific window installation.
Key Takeaways
- #8 and #10 diameter screws are the standard gauges for window installation, with #10 offering approximately 16% more shank diameter and greater holding power in dense framing materials.
- Nail-fin (new construction) windows use #8 pan-head or washer-head screws at 1 to 1.5 inches long, driven through the flange into sheathing and framing.
- Through-jamb (replacement/pocket) windows require longer screws, typically #8 or #10 at 2 to 3 inches, to bridge the gap through shims and penetrate at least 1 inch into structural studs.
- Concrete block installations, common in Florida, call for Tapcon masonry screws at 3/16-inch diameter with a minimum 1-3/4 inch embedment depth.
- Corrosion-resistant fasteners are not optional. Grade 304 stainless steel works for general outdoor use; Grade 316 stainless steel is required for coastal and saltwater environments.
- Screws outperform nails for window installation because they provide superior pull-out resistance, are adjustable after driving, and allow easy removal for future maintenance.
- Over-tightening window screws warps frames and breaks weatherseals. The recommended torque for residential window screws is 5 to 8 foot-pounds.
What Size Screws Do You Need for Window Installation?
The size screws you need for window installation depends on the installation method, the frame material, and the wall substrate. Most residential window installations use either a #8 or #10 gauge screw with a length between 1 and 3 inches. According to the American Screw Gauge Standards, a #8 screw has a major diameter of approximately 0.164 inches (5/32 inch), and a #10 screw has a major diameter of approximately 0.190 inches (3/16 inch). The difference between those two diameters, roughly 16%, translates into meaningful differences in holding power and load capacity.
The length of the screw changes based on how the window attaches to the wall. New construction windows with a nailing fin sit flat against the exterior sheathing, so the screw only needs to pass through the thin fin and sheathing to reach framing. Replacement windows installed through the side jamb need a much longer screw to span the jamb, the air gap, the shims, and still embed at least 1 inch into the stud. Concrete block walls, which are common throughout South Florida, require an entirely different fastener: a masonry anchor screw with a hardened tip designed to grip concrete without cracking it.
The manufacturer's installation instructions always take priority. Every impact windows product ships with a specific fastener schedule that lists screw diameter, length, head type, spacing, and minimum embedment depth. That schedule is part of the product's engineering certification. Using a different fastener can void both the warranty and the building code compliance.
Is a #8 or #10 Screw Stronger?
A #10 screw is stronger than a #8 screw. The #10 has a larger shank diameter of 0.190 inches compared to the #8's 0.164 inches, according to the American Screw Gauge Standards. That extra diameter gives the #10 roughly 34% more cross-sectional area, which directly increases both shear strength and pull-out resistance. The threads on a #10 also create wider grooves in the surrounding material, producing a more secure mechanical bond.
Strength alone does not determine the right choice. A #10 screw driven into a thin vinyl frame can crack the frame because the larger diameter displaces more material. A #8 screw provides enough holding power for most vinyl and aluminum window flanges without risking frame damage. The #10 is the better choice when the screw passes through thicker material, anchors into dense hardwood framing, or supports a heavier window unit. Large sliding glass doors and oversized picture windows often specify #10 screws because the weight of the glass demands a stronger fastener connection to the rough opening.
Data from SPAX Fasteners confirms that #8 and #10 are the two standard gauges carried by major fastener manufacturers specifically for window applications, with lengths up to 3 inches available in both sizes to cover different installation depths.
What Are the Best Screws for Installing Window Flanges?
The best screws for installing window flanges are #8 corrosion-resistant pan-head or washer-head screws, 1 to 1.5 inches long, driven through the pre-punched holes in the nailing fin and into the structural framing behind the sheathing. The wide, flat underside of a pan-head or washer-head screw distributes pressure across the thin vinyl or aluminum fin without punching through it. A narrow-headed screw, like a standard wood screw, concentrates force on a tiny point and can tear right through the flange material under wind pressure.
Graham Architectural Products specifies in their installation manual that all fasteners must be long enough to extend through the nail fin, penetrate through the sheathing, and embed at least 1 inch into the framing to support the window during wind load events. That 1-inch minimum embedment is the critical number. A screw that sits only in the sheathing, without reaching the stud behind it, provides almost no structural value during a storm.
GRK cabinet screws have become popular among professional installers for flange applications because of their Climatek coating, which is AC257 code-approved for use in pressure-treated lumber and rated for both interior and exterior use. The coating resists corrosion without the higher cost of full stainless steel construction.
Should You Nail Every Hole in a Window Flange?
No, you should not nail every hole in a window flange. Most window manufacturers specify fastening through every other hole for standard installations, according to Ply Gem's published fastener schedule for new construction vinyl nail-fin windows. Fastening every hole is only required in specific situations: mulled (joined) window units, windows rated above DP50 (design pressure 50), or installations in high-velocity hurricane zones where the anchoring schedule from the product's certification dictates closer spacing.
Over-fastening causes problems. Driving a screw or nail into every hole can pull the frame out of square, especially on vinyl frames that flex slightly under pressure. The correct approach is to start with one fastener near an upper corner to hold the window in position, then check for level, plumb, and square before driving any remaining fasteners. JELD-WEN's installation instructions explicitly warn against fastening all holes at once because it can lock the frame into an out-of-square position that prevents the sash from operating smoothly.
How Far Apart Should Screws Be for Window Installation?
Screws for window installation should be spaced 6 to 12 inches apart depending on the frame material. Wood frames require the tightest spacing at 6 to 8 inches between screws because wood is softer and each fastener carries less load. Vinyl frames allow wider spacing of 10 to 12 inches because the pre-punched holes in vinyl nailing fins are already positioned at the manufacturer's recommended intervals. Aluminum frames permit the widest spacing at 12 to 18 inches because the metal distributes load more evenly across the frame.
Closer spacing is required within 12 inches of any mull joint, which is the connection point where two window units are structurally joined together. JELD-WEN specifies that the first 12 inches beyond a mull joint, on both sides, must have a fastener through each hole in the fin to prevent the joint from separating under wind pressure.
What Screws Do You Use for Replacement Windows Installed Through the Jamb?
Replacement windows installed through the jamb use #8 or #10 screws, 2 to 3 inches long, driven through pre-drilled holes in the window frame's side jamb, through shims, and into the structural framing of the rough opening. JELD-WEN's installation instructions for custom and premium pocket windows include #8 x 3-inch installation screws as standard hardware. The extra length is necessary because the screw must bridge the thickness of the new window frame (typically 3/4 inch), the air gap, the shim material, and still penetrate at least 1 inch into the wall stud.
Through-jamb installation is the method used for residential impact windows in replacement scenarios where the existing frame stays in place and the new window inserts into the old opening. This method requires screws in the side jambs, typically two per side positioned 4 to 6 inches from the top and bottom. Larger windows add screws at the center of each jamb for additional support.
A critical step in through-jamb installation is shimming behind each screw location before driving the fastener. The shim prevents the frame from bowing inward when the screw is tightened. A bowed frame creates uneven gaps between the sash and the frame, which reduces energy efficiency and makes the window harder to open and close. According to This Old House, the correct technique is to hold the window in place with one 2-inch screw driven loosely through the upper side jamb, then shim and square the window completely before tightening any fasteners to their final position.
What Screws Do You Use for Concrete Block Window Installation?
Concrete block window installations use Tapcon masonry screws at 3/16-inch diameter with a minimum embedment depth of 1-3/4 inches into the concrete or masonry. Standard wood screws cannot grip concrete. Tapcon screws have hardened, specially designed threads that cut into the pre-drilled hole in concrete and create a strong mechanical hold without the need for plastic anchors or expansion sleeves.
Concrete block construction is the dominant wall type in hurricane-prone coastal regions, which means most window installations involve masonry anchoring rather than wood-framing attachment. The installation process requires a hammer drill to bore a pilot hole into the concrete block, followed by cleaning the hole of dust, and then driving the Tapcon screw with a standard drill or impact driver. The pilot hole must be 1/2 inch deeper than the intended screw penetration to leave room for dust accumulation at the bottom.
Construction experts recommend using 1/4-inch Tapcons embedded a minimum of 1-3/4 inches into the masonry opening for impact windows and doors. Each screw location must be shimmed behind the jamb to prevent frame distortion when the fastener is tightened against the concrete. Florida's High Velocity Hurricane Zone (HVHZ), which covers Miami-Dade and Broward counties, requires that the entire window system, including anchors, is tested as a unit under the product's Miami-Dade Notice of Acceptance (NOA). Deviating from the specified anchoring schedule voids the product approval.
What Screws Do You Use for Vinyl Window Frames?
Vinyl window frames require #8 or #10 self-tapping screws with a pan head or flat head, made from corrosion-resistant material. Self-tapping screws have sharp, pointed tips that cut their own threads into the vinyl without requiring a pre-drilled pilot hole. The threading action creates a tight grip inside the relatively soft PVC material that holds firmly without cracking the frame. According to eHow's fastener guide, the general recommendation for vinyl is a size-8 screw with a truss or pan head made from corrosion-resistant materials.
Vinyl expands and contracts with temperature changes more than wood or aluminum. This thermal movement means the screws must allow for slight frame adjustment over time. Installers avoid over-tightening screws in vinyl frames for this reason. The screw head should sit snug against the frame surface without compressing or denting the vinyl. A small gap of approximately 1/32 inch between the screw head and the vinyl allows the frame to expand and contract freely during seasonal temperature shifts.
What Screws Do You Use for Aluminum Window Frames?
Aluminum window frames require self-drilling screws with a drill-bit tip, typically #10 gauge, made from stainless steel or aluminum. Self-drilling screws differ from self-tapping screws in one important way: the drill-bit tip bores through the metal before the threads engage. Self-tapping screws need a pre-drilled pilot hole in aluminum because the metal is too hard for a pointed tip to penetrate cleanly. Self-drilling screws eliminate that extra step, which saves time and reduces the chance of misaligned holes.
The #10 gauge is preferred over #8 for aluminum frames because the denser metal provides stronger thread engagement with the larger screw. Aluminum is also prone to galvanic corrosion when it contacts dissimilar metals. Stainless steel or aluminum screws prevent this reaction. Carbon steel screws, even with a zinc coating, can create galvanic corrosion at the contact point with the aluminum frame, producing white powdery oxidation that weakens both the screw and the frame over time.
What Type of Screw Head Is Best for Window Installation?
The best screw head type for window installation depends on where the screw sits in the assembly. Pan-head screws work best for nail-fin applications because the wide, rounded top sits above the flange surface and distributes pressure evenly. Flat or countersunk heads recess below the surface, which is the preferred choice for side-jamb screws where a flush profile is needed to maintain a tight weatherseal. Wafer-head screws, which have an extremely low profile, are popular for flange installations where exterior trim will cover the screw head.
Hex-head screws serve a specific purpose at the bottom sill of larger windows and heavy entry doors. The hex head accepts a socket wrench, which provides the controlled torque needed to secure heavy window units at the sill without over-driving. The sill carries the full weight of the glass, so the fastener at the sill position requires more precise tightening than the side and top positions.
Drive type matters as well. Phillips-head drives are the most common, but Torx (star-shaped) drives offer better grip and reduce the chance of cam-out, which is when the driver slips out of the screw head and strips the recess. According to fastener industry data, Torx drives can improve labor efficiency on large window installation projects because the driver locks into the star shape and stays engaged under power.
What Is the Difference Between Self-Tapping and Self-Drilling Screws?
The difference between self-tapping and self-drilling screws is that self-tapping screws cut their own threads into a pre-drilled pilot hole, while self-drilling screws have a built-in drill-bit tip that creates the hole and threads in one step. Both types eliminate the need for a separate tap tool, but self-drilling screws also eliminate the need for a separate drill bit. The distinction matters for window installation because the wrong type for the frame material either fails to penetrate or strips the hole.
Self-tapping screws work best with softer materials like vinyl (UPVC) and softwood. The sharp, tapered point pushes into the material and the threads cut grooves as the screw turns. Self-drilling screws work best with harder materials like aluminum, steel, and composite frames. The drill-bit tip bores a clean hole through the metal before the screw's threads engage. Using a self-tapping screw in thick aluminum without a pilot hole forces the installer to apply excessive pressure, which often strips the hole or cracks the surrounding material.
Do You Need to Pre-Drill Holes for Window Screws?
Yes, you need to pre-drill pilot holes for window screws in hardwood framing, thick aluminum, and all masonry substrates. Pre-drilling is not required when using self-drilling screws in thin metal or self-tapping screws in vinyl and softwood. The pilot hole should be slightly smaller than the screw's root diameter (the shank diameter minus the thread depth) so the threads still have material to grip.
Pre-drilling serves two purposes. First, it prevents the surrounding material from splitting. Hardwood jambs and aged lumber are especially prone to cracking when a screw forces material apart without a guide hole. Second, pre-drilling ensures the screw drives straight. A screw that wanders off-axis in dense material can push the window frame out of alignment. The recommended pilot hole size for a #8 screw in hardwood is 7/64 inch; for a #10 screw, the recommended pilot is 1/8 inch.
Do You Use Screws or Nails to Install Windows?
Screws are the preferred fastener for window installation over nails. Screws provide superior pull-out resistance, are adjustable after driving, and can be removed cleanly for future repairs or replacement. Nails have greater shear strength (resistance to side-to-side force) than screws of the same length, according to M. Fine Lumber's fastener guide. However, the primary stress on a window fastener is pull-out force from wind pressure, not lateral shear. Screws outperform nails on the metric that matters most for window performance.
Data from BobVila.com shows that more than $10.3 billion of nails and $4.3 billion of structural wood screws are sold annually in the United States. Despite nails' dominance in overall construction volume, screws have become the standard for impact doors and window installations because of the performance advantages. Ring shank nails can increase holding power by 40% or more over smooth-shank nails, but even ring shank nails cannot match the thread-to-material engagement that screws provide.
The term "nailing fin" suggests nails, but modern practice has largely moved to screws. As Marvin Windows notes in their nailing fin guide, screws work better for flange attachment, and the name is historical rather than prescriptive.
FactorScrewsNailsPull-Out ResistanceHigh; threads grip material along entire shankLower; relies on friction and compression onlyShear StrengthModerate; can snap under extreme lateral loadsHigh; bends rather than snaps under lateral forceAdjustabilityEasy to back out and re-drive for frame squaringDifficult to adjust once driven without damaging finRemovalClean removal with a drill or driverRequires prying; risks bending the flangeInstallation SpeedSlower per fastener; requires a drill or driverFaster with a pneumatic nail gunVibration Risk to GlassNone; rotational driving produces no impactPresent; hammer strikes can stress laminated glassBest Use CaseAll window types; especially impact-rated unitsLightweight non-impact windows in calm climates
How to Install a Window Without Nailing the Flange?
To install a window without nailing the flange, use corrosion-resistant screws driven through the pre-punched holes in the nailing fin and into the framing behind the sheathing. The process is identical to a nailed installation except that a drill or impact driver replaces the hammer. Start by driving one screw near an upper corner to hold the window temporarily. Check for level and plumb. Shim as needed at the jamb locations. Then drive the remaining screws according to the manufacturer's fastener schedule, checking alignment after every two or three screws.
The screw-only approach eliminates the risk of hammer vibration reaching the glass, which is especially important for impact protection products with laminated glass layers. A sharp hammer blow near the edge of an impact-rated window can stress the polyvinyl butyral (PVB) interlayer that holds the glass together during a storm. Screws avoid that risk entirely.
Should You Use Stainless Steel Screws for Window Installation?
Yes, you should use stainless steel screws for any window installation exposed to outdoor weather, and stainless steel is mandatory for coastal and hurricane-zone installations. Standard carbon steel screws corrode when exposed to moisture, and galvanized coatings degrade over time. According to SFS USA, a leading fastener manufacturer, stainless steel screws contain 18-20% chromium that forms a self-healing oxide layer on the surface, preventing rust from starting even in wet conditions.
The choice between Grade 304 and Grade 316 stainless steel depends on proximity to saltwater. Marsh Fasteners reports that Grade 316 costs 20-30% more than Grade 304 but provides significantly better resistance to chloride-induced pitting corrosion because of its molybdenum content. For homes in South Florida's coastal communities, from Key Largo through Fort Lauderdale and up to West Palm Beach, Grade 316 stainless steel is the correct specification. Grade 304 is adequate for homes located more than 10 miles inland from any saltwater body.
One fastener industry case study documented a project where #8 x 1-inch galvanized screws failed within two years at a coastal site, requiring complete re-fastening of multiple windows. Switching to stainless steel #10 x 2-inch screws solved the corrosion problem permanently, according to the ToolsRadar field report.
Can You Use Drywall Screws for Window Installation?
No, you should not use drywall screws for window installation. Drywall screws are made from hardened brittle steel that snaps under lateral load rather than bending. The thin shank diameter provides inadequate holding power for a window frame that must resist sustained wind pressure. Drywall screws also have no corrosion protection, meaning they rust rapidly when exposed to any outdoor moisture.
The bugle-shaped head on a drywall screw is designed to countersink into soft drywall paper, not to distribute load across a window flange. Using drywall screws in a window flange concentrates stress at a tiny point, which can tear through vinyl or aluminum fins under wind pressure. Building inspectors will fail an installation with installation mistakes like non-approved fasteners, and the manufacturer's warranty becomes void the moment an unapproved screw replaces the specified fastener.
What Happens If You Use the Wrong Screws for Windows?
Using the wrong screws for windows causes frame warping, air infiltration, water intrusion, failed building inspections, accelerated corrosion, and voided product warranties. Each of these consequences stems from a specific mismatch between the screw and the installation requirements.
Screws that are too long penetrate too deeply into the frame and can hit the glass edge, cracking the pane or damaging the seal between the glass layers. Screws that are too short fail to embed properly in the framing and can pull out under wind load. The recommended torque for residential window screws is 5 to 8 foot-pounds, according to industry guidelines. Over-tightening beyond that range warps vinyl and aluminum frames, creating visible bowing that disrupts the weatherseal and allows air and water to pass through.
In hurricane-prone areas, the consequences escalate. Hurricane Andrew struck South Florida in 1992 with 165 mph winds, causing $27 billion in damage and destroying more than 25,000 homes in Miami-Dade County alone, according to the Federal Alliance for Safe Homes. The building code reforms that followed made proper fastening a matter of life safety, not just convenience. The Florida Building Code now requires that windows be installed according to the manufacturer's instructions using approved fasteners, sealants, and flashing. The Miami-Dade NOA specifies exactly how each product can be installed, including fastener type, spacing, and embedment depth.
What Are Common Window Installation Mistakes?
Common window installation mistakes related to fasteners include over-tightening screws, using the wrong screw length, skipping pilot holes, using non-corrosion-resistant fasteners, and ignoring the manufacturer's spacing schedule. Each mistake compromises the window's performance in a specific way.
- Over-tightening pulls the frame inward and creates a visible bow between screw points. The bowed frame breaks contact with the weatherseal, allowing air and water to enter.
- Using screws that are too short leaves the window vulnerable to pull-out under wind pressure. Every screw must embed at least 1 inch into structural framing.
- Skipping pilot holes in hardwood or masonry causes splitting, cracking, and stripped holes that reduce the screw's holding power by as much as 50% or more.
- Using carbon steel screws in outdoor or coastal applications leads to corrosion within 1 to 3 years, weakening the fastener connection and staining the frame and wall.
- Ignoring the manufacturer's spacing schedule, either by placing screws too far apart or too close together, creates uneven load distribution across the frame.
- Fastening all flange holes before checking level and plumb locks the frame in a misaligned position that cannot be corrected without removing every screw.
We see these DIY installation issues often during consultations. The most frequent problem is corroded fasteners on homes within a few miles of the coast, where standard zinc-coated screws failed within just a couple of years. The fix is simple but expensive: remove every compromised screw, clean the holes, and re-fasten with the correct stainless steel grade.
Frequently Asked Questions
Are Replacement Windows Done From Inside or Outside?
Replacement windows are installed from either inside or outside depending on the installation method. Pocket replacement windows, which slide into the existing frame opening, are typically installed from the inside of the home. The installer removes the old sashes, cleans the opening, applies sealant, inserts the new unit, shims it square, and drives screws through the jamb from inside. Full-frame replacement windows, which remove the entire old frame, are installed from the outside because the installer needs access to the rough opening and the exterior sheathing.
How Many Screws Do You Need Per Window?
A standard-size window requires 8 to 12 screws for a secure installation. The typical layout is 2 to 3 screws per side jamb, 2 to 3 across the top, and 1 to 2 at the bottom sill for heavier units. Larger windows and mulled (joined) units require additional screws at the mull joint and at closer spacing intervals. The manufacturer's fastener schedule provides the exact count for each window model and size.
What Size Tapcon Screws for Window Installation in Concrete?
Tapcon screws for window installation in concrete should be 3/16-inch or 1/4-inch diameter with enough length to pass through the window frame, any shim material, and embed at least 1-3/4 inches into the masonry. A 3-1/4 inch Tapcon is a common choice for through-jamb installations in concrete block walls. The pilot hole should be drilled with a carbide-tipped masonry bit matched to the Tapcon's specified hole diameter.
Do Window Screws Need to Be Waterproof?
Window screws need to be corrosion-resistant rather than waterproof because no screw is fully sealed against moisture penetration. Stainless steel, galvanized steel, and specialty coatings like Climatek all resist corrosion from water contact. The sealant and flashing around the window provide the actual waterproofing barrier; the screw itself resists rust to maintain its structural integrity over the window's 20-to-50-year lifespan.
Can You Reuse Screws From an Old Window Installation?
No, you should not reuse screws from an old window installation. Old screws may have micro-corrosion that weakens the shank, stripped threads from removal, or a diameter that does not match the new window's specifications. New windows include hardware or specify exact fastener requirements in their installation instructions. Reusing old screws risks failing a building inspection and voids the new window's warranty coverage.
What Is the Recommended Torque for Window Installation Screws?
The recommended torque for most residential window installation screws is 5 to 8 foot-pounds. This range provides enough clamping force to secure the frame without warping vinyl or bending aluminum. A cordless drill with adjustable clutch settings is the easiest way to control torque. Set the clutch to disengage at the appropriate resistance level, then drive each screw until the clutch clicks. Over-tightening beyond 8 foot-pounds risks compressing weatherseals and bowing the frame.
The Bottom Line
Choosing the right screw for a window installation comes down to matching the screw gauge, length, material, and head type to the specific installation method and wall substrate. A #8 or #10 screw at 1 to 1.5 inches handles nail-fin applications. A #8 or #10 at 2 to 3 inches covers through-jamb replacement installations. Tapcon masonry screws at 3/16-inch diameter handle concrete block walls. Stainless steel is the right material for any exterior application, with Grade 316 required for coastal environments.
The Federal Alliance for Safe Homes reports that 65% of Florida's 21 million residents live in areas requiring impact protection or storm shutters. For those homeowners, the fastener holding the window to the wall is the final link in the chain between the engineered glass and the structural frame of the house. Every link in that chain needs to be the right size, the right material, and installed to the right specification.
If you have questions about the right screws for your specific window project, or if you want a professional assessment of your home's window installation needs, we are happy to help. Call us at 786-933-9815 or visit ASP SuperHome to request a free estimate.
Meet With a Project Manager
Your first conversation is with a Project Manager who takes the time to understand your goals, walk you through your options, and stays connected throughout your project — from the initial consultation through the final walkthrough.
.avif)
.avif)
.avif)
%201.avif)
Insights & Resources
Stay informed with expert tips on roofing materials, hurricane codes, repairs, and South Florida construction standards.



%201.avif)
%201%20(1).avif)

%201.svg)
%201%20(1)%20(1).png)
.png.png)
.png%20(1).png)
.png%20(2).png)
.avif)
.avif)


.png)
.svg)
.png)